My new CPS system (Almost Done!!!)

Guides and discussions about building water blasters and other water warfare devices such as water balloon launchers.
Andrew
Posts: 519
Joined: Fri Sep 30, 2011 1:10 pm
Location: Durham, England

Re: My new CPS system

Post by Andrew » Wed Jun 27, 2012 11:46 am

Fishfan wrote:I could also just screw in an adapter to my nozzle area, and hook the hose to that for my QFD. That is what I was thinking of doing.
Yes that does work (that's what I originally did) but it does mean you can't fill and fire at the same time (leaving you defenceless unless you have a decent backup, and you have to remember to close the firing valve before disconnecting it (yeah, I did that a few times :goofy: ) which can be overlooked in the heat of battle. To be fair, in a CPH with a LRT bladder, using the nozzle as the QFD means you are less likely to burst the bladder (you can regulate the flow with the ball valve) unless you have a very good PC case, or a pressure relief valve (allowing you to refill the reservoir too! :D ).
Fishfan wrote:Also, what is a nozzle laminator?
One of these:
Image (from wayne's this and that)

That particular one was from a CPS2000 nozzle, and 'laminates' the stream to make it more coherent (usually improving range)

JLSpacemarine made a guide for a homemade laminator. You might want to make such a laminator detachable from your blaster, so you're riot blast will still be effective. I've used a similar setup in my homemade with good results.

EDIT:
Ninja'd :goofy:

Fishfan
Posts: 544
Joined: Thu Jun 07, 2012 9:06 am
Location: Florida
WWN League Team: Havoc

Re: My new CPS system

Post by Fishfan » Wed Jun 27, 2012 8:24 pm

It will have to be detachable. My ball valve is a screw in. Anyways, that is exactly what I found, the JLSpacemarine's guide.

Fishfan
Posts: 544
Joined: Thu Jun 07, 2012 9:06 am
Location: Florida
WWN League Team: Havoc

Re: My new CPS system

Post by Fishfan » Sat Jul 07, 2012 3:56 pm

I built the laminator, but unfortunately when I tested it, everything, the screens and straws blew out. my design is different than JLspacemarine's though I did

screw 1/2 inch male-to-screw 3/4 male adapter ---- Female 3/4 screw coupling ---------- 3/4 inch screw male-to-1/2 inch screw female bushing
instead of two male screw 1/2inch to 3/4 male screw and a 3/4 inch screw coupling.
I don't know if you understand that, but anyways, the bushing side is the one that fires. Maybe I should try switching them around. Also, maybe should I try to put the laminator before the ball valve? I'm just shooting ideas out there right now. I also don't think this makes much of a difference, but I used screens that are put in those smoking pipes, (no one in my family smokes, my dad had just seen them before) because I couldn't find any sink aerator screens at Lowes or Ace. Because they are fairly light duty, I put two screens in on each side instead.
Another thing, the straws I used seem to be much thinner in diameter that the one JLspacemarine used. I put, I think 11 or 12 straws in there.
Any suggestions on this matter is greatly appreciated.

Fishfan
Posts: 544
Joined: Thu Jun 07, 2012 9:06 am
Location: Florida
WWN League Team: Havoc

Re: My new CPS system

Post by Fishfan » Mon Jul 09, 2012 10:23 am

I am going to be on vacation, so I can't do any more work on the gun until after august 7th. When I get back, I'm going to take apart the LRT, because when it is not pressured, it looks like there is a small bulge in the LRT, so it may have popped again. Anyways, I need to take the third layer off, because even though it gives it more power, it is super hard to pump. I don't think I'm going to use more than two layers on future builds, unless it will be solely a QFD reliant gun (like the powerpak, or Ben's leftovers gun)

User avatar
atvan
Posts: 1226
Joined: Tue May 24, 2011 5:19 pm
Location: A place you've never heard of

Re: My new CPS system

Post by atvan » Mon Jul 09, 2012 6:04 pm

Even with a QFD, you can't go overpowered, because hose pressure is not as high as you might think.

Also, I believe that Leftovers was made by Drenchenator.
DX wrote:In the neanderthal days of K-modding, people would lop off the whole PRV
Well, not that much soakage.
Beware the Purple

Fishfan
Posts: 544
Joined: Thu Jun 07, 2012 9:06 am
Location: Florida
WWN League Team: Havoc

Re: My new CPS system

Post by Fishfan » Mon Jul 09, 2012 7:52 pm

It said the builder was Ben, Drenchenator compiled the page.

Andrew
Posts: 519
Joined: Fri Sep 30, 2011 1:10 pm
Location: Durham, England

Re: My new CPS system

Post by Andrew » Mon Jul 09, 2012 8:02 pm

Is the mesh bent/broken? When I used aluminium mesh (bad choice with brass due to corrosion anyway :goofy: ) the mesh bend and buckled with the force of the water and eventually burst firing bits of mesh and straws out of the nozzle.

As long as the mesh is larger than the bushing hole (assuming the mesh isn't easily bent, like aluminium, or fine grade stainless mesh for example) it shouldn't bow out of the nozzle. If you could post a pic of the mesh in the bushing section that would help us to see the problem.

I wouldn't put the laminator before the valve. The less stuff which can leak before the valve the better. Also, the ball valve will distort the flow of the water slightly, and the laminator needs to be placed after the valve to smooth it out.

atvan is right, you can achieve higher-than-hose pressure with a 1/2" pump. The third layer is probably overkill anyway.

User avatar
atvan
Posts: 1226
Joined: Tue May 24, 2011 5:19 pm
Location: A place you've never heard of

Re: My new CPS system

Post by atvan » Tue Jul 10, 2012 12:20 pm

For my laminator, I just cut an old window screen into the right size and shape. Easy, durable, quick.

And Fishfan( you're right about leftovers :soaked:
DX wrote:In the neanderthal days of K-modding, people would lop off the whole PRV
Well, not that much soakage.
Beware the Purple

Fishfan
Posts: 544
Joined: Thu Jun 07, 2012 9:06 am
Location: Florida
WWN League Team: Havoc

Re: My new CPS system

Post by Fishfan » Fri Jul 13, 2012 12:37 pm

I can't take any pictures, because my water gun is right now on the other side of the Atlantic, and approx. 15-18 hrs away. It will be august 7th before I get back, so you won't be seeing any pictures here.
But I will try anything that come along.

zeda.beta
Posts: 29
Joined: Sun Feb 14, 2010 12:54 pm
Location: Chicago, Illinois

Re: My new CPS system

Post by zeda.beta » Wed Jul 18, 2012 1:58 am

I made a leftovers back in the day, but my laminators were pretty good too. Thin wall plastic pipe i picked up somewhere (no idea), with the same rigidity as a normal piece of 1/4 inch abs while being less than a mm thick. Somewhere around 20 of those fit into a 2 in pvc pipe, and the space between was filled with rtf.
I reject your reality and substitute my own.

Fishfan
Posts: 544
Joined: Thu Jun 07, 2012 9:06 am
Location: Florida
WWN League Team: Havoc

Re: My new CPS system

Post by Fishfan » Sun Aug 12, 2012 10:06 am

Well, now I'm back, and I need to fix this laminator.
I took apart the LRT layers, and it turned out the inner layer popped again. but thankfully, its only the innermost layer, and I have a replacement for that. I've got the bladder together again, and when I was about to test it, the solar shower sprung a leak at the place where the hose connects to the bag. My dad epoxied that, so now my only problem left is the laminator (hopefully). Any suggestions on how to keep it together?
EDIT: I found this on amazon: Would it stay in place?
http://www.amazon.com/gp/product/B000H5 ... e=&seller=

Andrew
Posts: 519
Joined: Fri Sep 30, 2011 1:10 pm
Location: Durham, England

Re: My new CPS system

Post by Andrew » Sun Aug 12, 2012 3:00 pm

The screens need to be rigid. I'm not sure how rigid those particular ones are, but if they are too flimsy they'll just be forced straight out even if you layer them (you shouldn't be able to force the screens out even if you push with your finger). Did you try the laminator the other way round in the end, so that the male-male reducer is at the output side of the laminator? Have you been testing it with something threaded into the bushing (I'm guessing you are using a female threaded bushing to fit male hose barb nozzles. I can't think of any other reason you would use a bushing instead of a male-male reducer as, on it's own, the threads in the bushing would ruin the coherence of the stream.)? if not, the exit hole is larger and more likely to let the screens through.

As ever, some pics (preferably from the inside, showing how much of a ledge the screen has to rest on) would help us to be more specific.

Glad to hear you've sorted all the other little problems.

Fishfan
Posts: 544
Joined: Thu Jun 07, 2012 9:06 am
Location: Florida
WWN League Team: Havoc

Re: My new CPS system

Post by Fishfan » Sun Aug 12, 2012 4:56 pm

Well, I can easily push the screens I have out. the only replacement areator screens I could find were on amazon. Lowes, Home depot, Ace, they have the whole thing that you just screw in, not just the screens themselves.
Also, I'm going to have the bushing before the laminator. Ball valve --- adapter ----bushing ----coupling -------male-male reducer

not sure if the diagram makes sense, but I hope it does.

BlueShard
Posts: 4
Joined: Mon Mar 05, 2012 1:28 pm

Re: My new CPS system

Post by BlueShard » Tue Aug 21, 2012 11:40 am

Lucky You... I have no Pvc in my area so I can't make my own without the cost being incredibly high (£100+)
Current Amoury:
CPS 1000 (~£15), SS 50 (£5), a XP 310 (~£10) and a ThunderStorm (#19.99)
So... The most expensive gun in my arsenal is a ThunderStorm :) I's also the worst

Fishfan
Posts: 544
Joined: Thu Jun 07, 2012 9:06 am
Location: Florida
WWN League Team: Havoc

Re: My new CPS system

Post by Fishfan » Tue Aug 21, 2012 2:43 pm

Well, I did spend over a $120 on this water gun. I've developed some designs in my head that should be much more battle-practical than this one, and hopefully will not be as expensive because I won't have so many mistakes where I will have to buy more parts.

Fishfan
Posts: 544
Joined: Thu Jun 07, 2012 9:06 am
Location: Florida
WWN League Team: Havoc

Re: My new CPS system

Post by Fishfan » Sun Sep 23, 2012 12:41 pm

Okay. (I know this is a double post, but I feel this post is worthy of a separate post.)
I have been procrastinating working on this gun for a while. Right now I have made a list of noticeable problems with the gun and my current Ideas for solutions.
1.)Pump: The pump is difficult to pump, probably because lack of lubrication and third layer of LRT makes it very difficult to pump.
Solution: Lubricate pump, remove 3rd layer of LRT (Has been done)
2.)Range: Poor stream lamination makes between 30-35 ft level range.
Solution: Make a Nozzle laminator. (Work in progress)
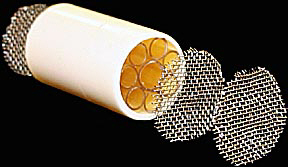
3.)Bladder: LRT has popped twice, first on the two inner layers, second time, only the inner layer.
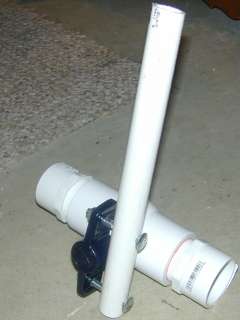
Solution: No solution I have come up with yet. I will give you information about it so anyone can help me with solving this problem. I have two layers, each 1 foot long. The case is 2 feet long, 4" DWV pipe. Hope this info helps. Will give more if needed.
4.)Firing system: Plastic ball valve extremely hard to turn.
Solution: Replace plastic ball valve with a metal ball valve, or add a torque arm. (Has not been worked on)
5.)Reservoir: The 5 gallon solar shower has a hole right where the tubing meets the bag, and this has happened to another solar shower I have not used for homemade water gun purposes.
Solution: Glue/epoxy hole, or use 3000/3200 backpack. (has been attempted,, but not successful probably due to old epoxy.)
6.)Backpack: I do not have a frame backpack, and I do not know how to make one.
Solution: No solution that I have come up with yet. I would like to have a frame, so I distribute the weight on my legs, not my shoulders.
7.)Weight: the water gun is fairly heavy, even when I don't have it pressurized.
Solution: Replace 4" DWV pipe with 4" Drain pipe, which is much lighter. I'm not sure if the DWV endcaps will fit on the drain pipe though. (Has not been worked on)
So there is my list, and any suggestions on solutions would be appreciated.

Edits:
Added solution to the reservoir/backpack problem. (Poseiden2000)
Added solution to the firing system problem.(Andrew)
Last edited by Fishfan on Sun Sep 23, 2012 11:05 pm, edited 4 times in total.

Poseidon2000
Posts: 600
Joined: Mon Aug 13, 2012 6:29 pm
Location: NYC
WWN League Team: Catskill Mountain SEALs

Re: My new CPS system

Post by Poseidon2000 » Sun Sep 23, 2012 1:04 pm

Well, for the backpack/reservoir, you can use a camelbak. The largest I've found is 8 liters, about as much as a 3000. That's effective.
Image

Fishfan
Posts: 544
Joined: Thu Jun 07, 2012 9:06 am
Location: Florida
WWN League Team: Havoc

Re: My new CPS system

Post by Fishfan » Sun Sep 23, 2012 2:37 pm

I like that idea, because a solar shower doesn't fit around my back very well. Camelbaks are designed to do that. Where did you find an 8L camelbak? The largest I've seen is 3L, and I take pride in mine because even though its only 3L, it's larger than most.
Thanks for the idea,, I will update my post.

Poseidon2000
Posts: 600
Joined: Mon Aug 13, 2012 6:29 pm
Location: NYC
WWN League Team: Catskill Mountain SEALs

Re: My new CPS system

Post by Poseidon2000 » Sun Sep 23, 2012 3:21 pm

They may not look like camelbaks, but it's on the same site.... :oo:
Image

Andrew
Posts: 519
Joined: Fri Sep 30, 2011 1:10 pm
Location: Durham, England

Re: My new CPS system

Post by Andrew » Sun Sep 23, 2012 4:16 pm

For the ball valve, you could add a torque arm. Like this from Supercannon:

Image

Plastic ball valves are hard to turn anyway, but brass will just add to the already excessive weight.

Post Reply

Who is online

Users browsing this forum: No registered users and 47 guests