Page 1 of 3
Modding My XP Pool Pumper Blaster!
Posted: Wed Jun 19, 2013 4:46 pm
by marauder
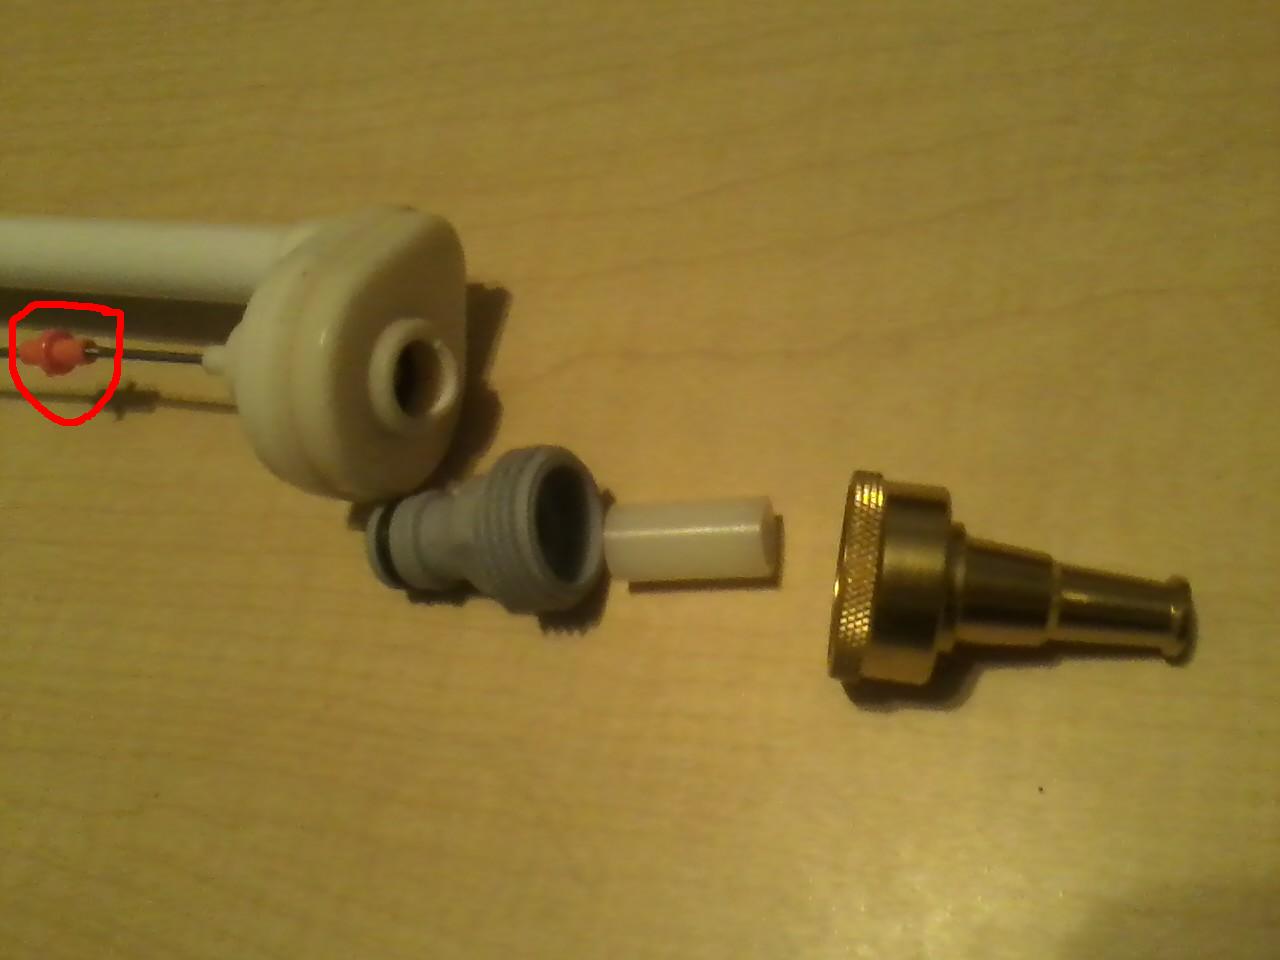
Ok, I've finally got the money and time to do this. I have several mods planned, but first I need to create a nozzle as the stock nozzle is broken off.
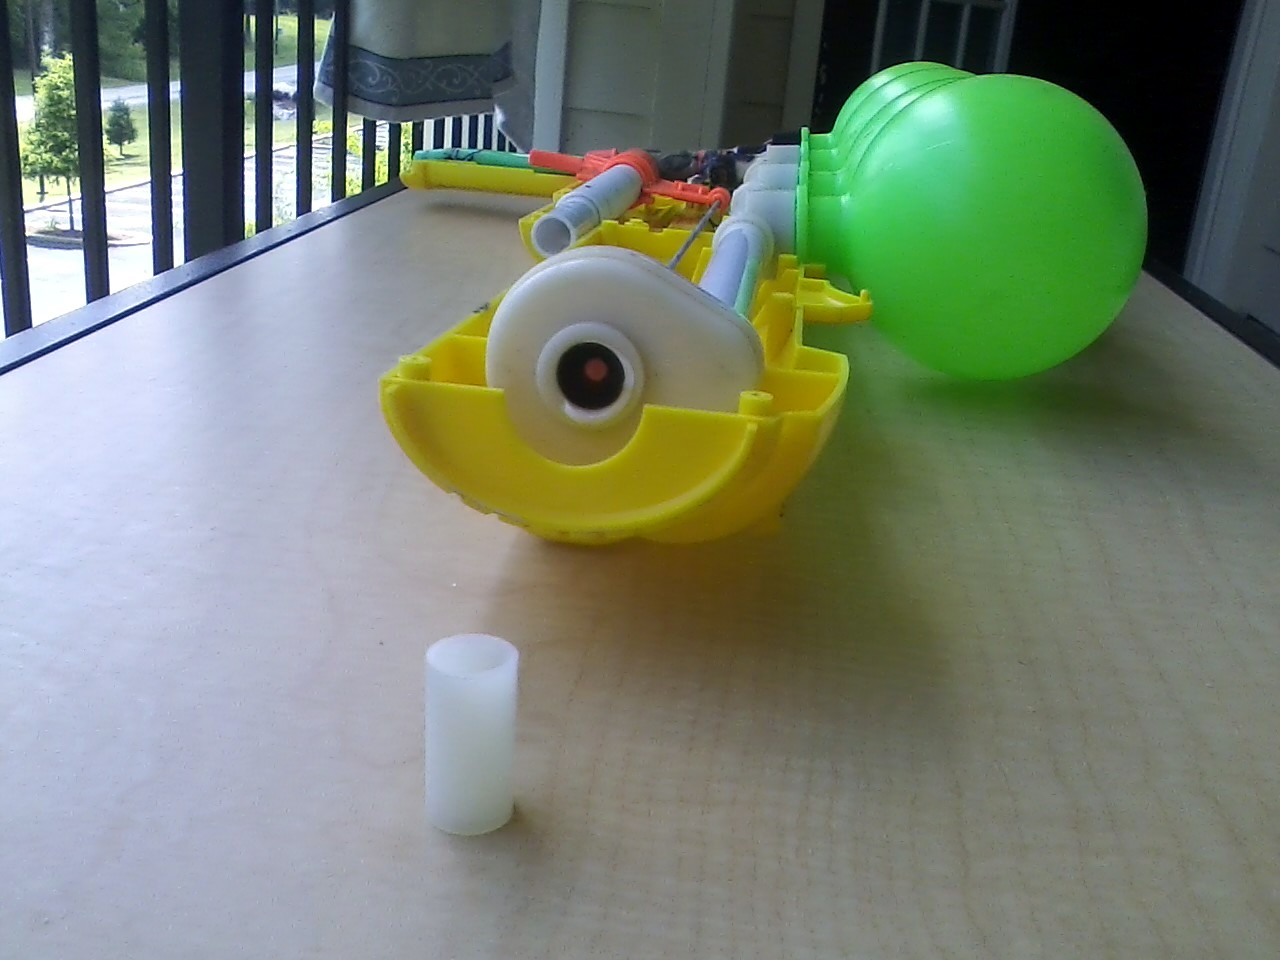
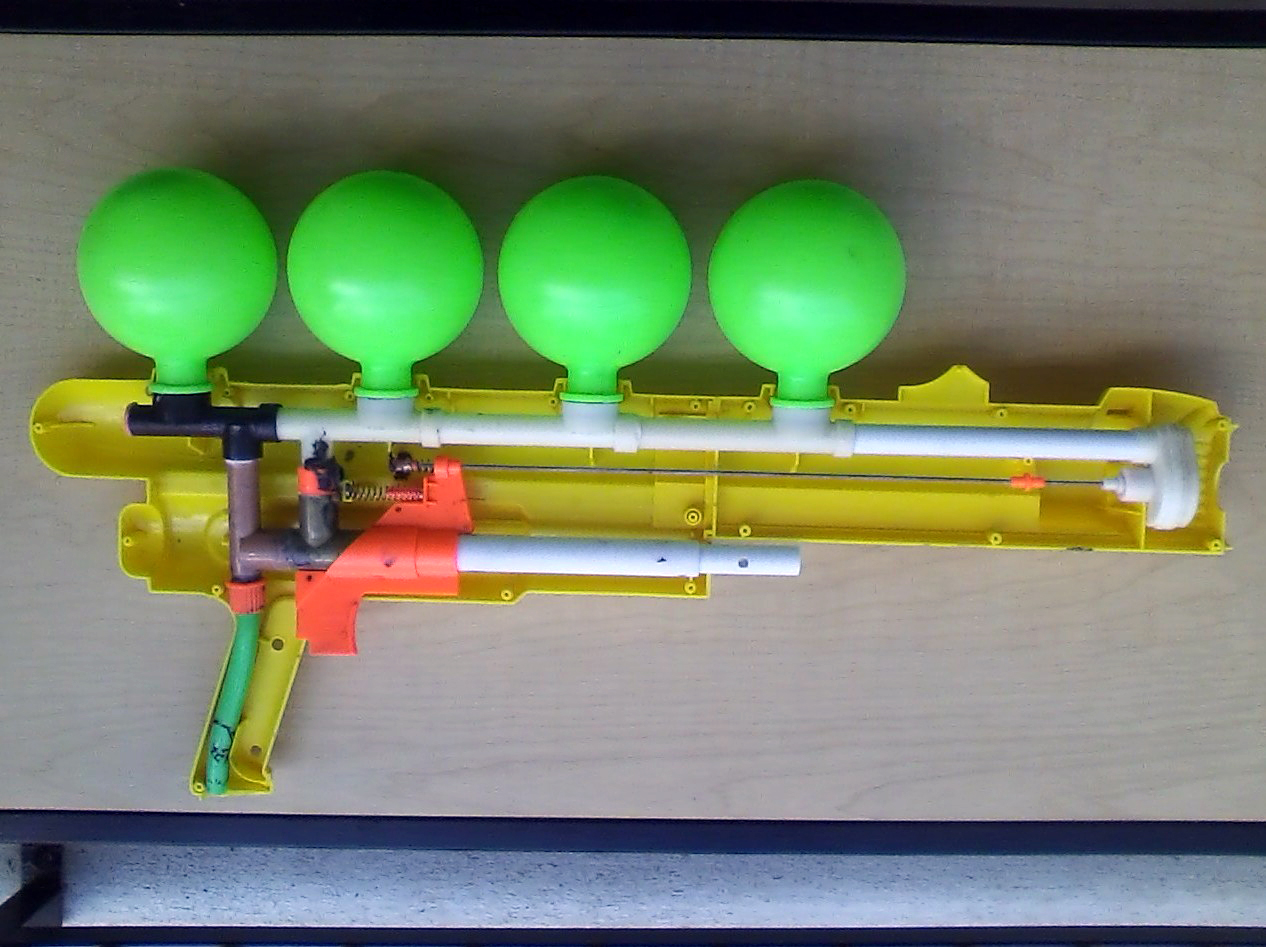
This piece of PVC fits perfectly inside what's left of the nozzle aperture. I'm thinking of epoxying this piece inside the aperture to give myself a little base to build off of. My ultimate goal is to be able to place one of these onto the gun:

Ideally I would like to be able to screw this nozzle on and off so that I can switch it out with others. My question to you is how to go about this? Also, do you recommend making a laminator or not. I'm kind of thinking that it won't need one due to the conical nozzle design. I don't want to slow the stream speed down too much, but again this is just a guess and what I'm leaning towards right now.
Here's a view of the rest of the internals.
Re: Modding My XP Pool Pumper Blaster!
Posted: Wed Jun 19, 2013 5:12 pm
by DukeSoakem
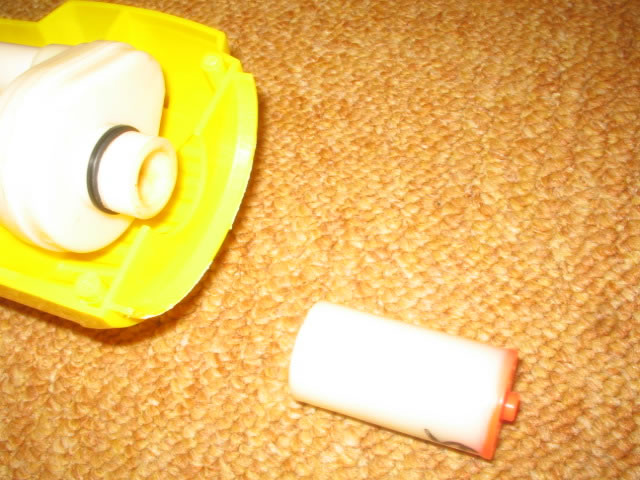
One thing I should note is that there might be different versions, I can't tell from the picture whether yours had this, but the one I had years ago the nozzle could screw off, as seen below:
The use of the piece of PVC is a good base and support, along with that my suggestion would be to put a male to female threaded adaptor of the right size to fit over the PVC.

The front female end which is threaded would be whatever the size of the conical threaded piece would be so you can screw it on. I'm not sure about a laminator, but putting it on the inside of the attachable nozzle you have planned wouldn't hurt, although to me those nozzle pieces look very well designed to me for applications like these.
Also just to throw some info out there, the Pool Pumper Blaster I had suffered with pressure related problems in the form of it being very difficult to pull the trigger when fully pumped, I probably just got unlucky, although since that's the only one I had then I don't know. It'd be nice to get a fully working one again someday, however they either never appear on eBay or when they do they are way overpriced.
Re: Modding My XP Pool Pumper Blaster!
Posted: Wed Jun 19, 2013 5:47 pm
by the oncoming storm
I wouldn't use a straw type laminator, overall conical nozzles are the best way of lamination.
Re: Modding My XP Pool Pumper Blaster!
Posted: Wed Jun 19, 2013 7:16 pm
by Nemesis
No laminator, conical nozzle will do better with less slowage of the stream. Be sure to make any nozzle able to unscrew so that you have a riot blast!!!
Re: Modding My XP Pool Pumper Blaster!
Posted: Wed Jun 19, 2013 7:48 pm
by Drenchenator
This could be trickier to fix than you think.
Simply attaching the pipe perpendicularly to the valve (a
butt joint) is weak and liable to break again. There should be some kind of overlap to strengthen the joint. This is mostly to prevent force in the direction of the valve's plane from breaking off the nozzle. The easiest way to implement this idea would be to put the pipe into the valve's aperature.
But there doesn't appear to be enough length in the valve's aperture to create a quality overlapping joint. Attaching the pipe inside the aperature may be just as weak as attaching it on the outside.
So we go back to the butt joint. Another solution may be to attach a rather thick pipe perpendicularly to the valve. This would maximize the surface area that the valve and pipe share, which maximizes the bond strength. I don't know how wide the valve's aperture is, but if you find a pipe size that is thick and fits over it, this idea may work. Or it still may be too weak. This is why I think this problem is tricky: there is no easy solution.
The question of using straws or a conical nozzle can't really be answered without testing. Straws do a good job of concentrating the direction of the flow and slowing it down. A conical nozzle concentrates the flow onto a single point and speeds up the flow. Ideally, you should use both, but if I had to choose one, I'd say the conical nozzle is more important because it prevents the formation of eddies and recirculating zones from the
sudden contraction in pipe diameter. But remember that conical nozzles have one big disadvantage -- they have a fixed nozzle size, which may not be optimal for the particular gun. Straws allow variable nozzle sizes. In the end, only experiments will tell if the conical nozzle performs better, or if the straws and an optimized nozzle size perform better.
Re: Modding My XP Pool Pumper Blaster!
Posted: Wed Jun 19, 2013 8:51 pm
by soakinader
I have to say, darn it. I literally just logged on to PM you an offer to buy this. Well, good luck with the mods. Don't forget to add strap mounting points! (unless it's too top heavy)
Re: Modding My XP Pool Pumper Blaster!
Posted: Wed Jun 19, 2013 10:43 pm
by marauder
Wow, there's been a lot of great replies already.
Duke, our guns aren't different marks. The original nozzle also screwed off. Unfortunately, I cannot remember what happened with it. I screwed a waterballoon filling nozzle onto the male threaded ends where the nozzle screwed on. When I pulled the trigger the force was so great that it ripped the waterballoon filler off and launched it like 40 feet into the air. I then tested the gun out with a brass conical blasting nozzle that was even longer than the one pictured above. It was 6" if I remember correctly. I had the exact same problem you mentioned, it wouldn't fire at full pressure. I don't get what was wrong. I took the gun apart, depressurized it, put it back together. It fired without a nozzle, so I put the brass conical nozzle back on, repumped, pulled the trigger and it wouldn't fire. I was in CT at this point, so I let DX take a look at it, and I can't remember the conclusion that he came to, but when I got it back I had the same problem and in trying to get the brass nozzle off I almost completely broke the male threaded end off. That's why you see the rough ridge on the bottom right part of the nozzle aperture. So, that's how I got to where I am now.
Drench, the picture isn't good at showing this, but I can actually fit almost half an inch of the little pipe into the open/broken nozzle aperture. It's pretty close to a snug fit.
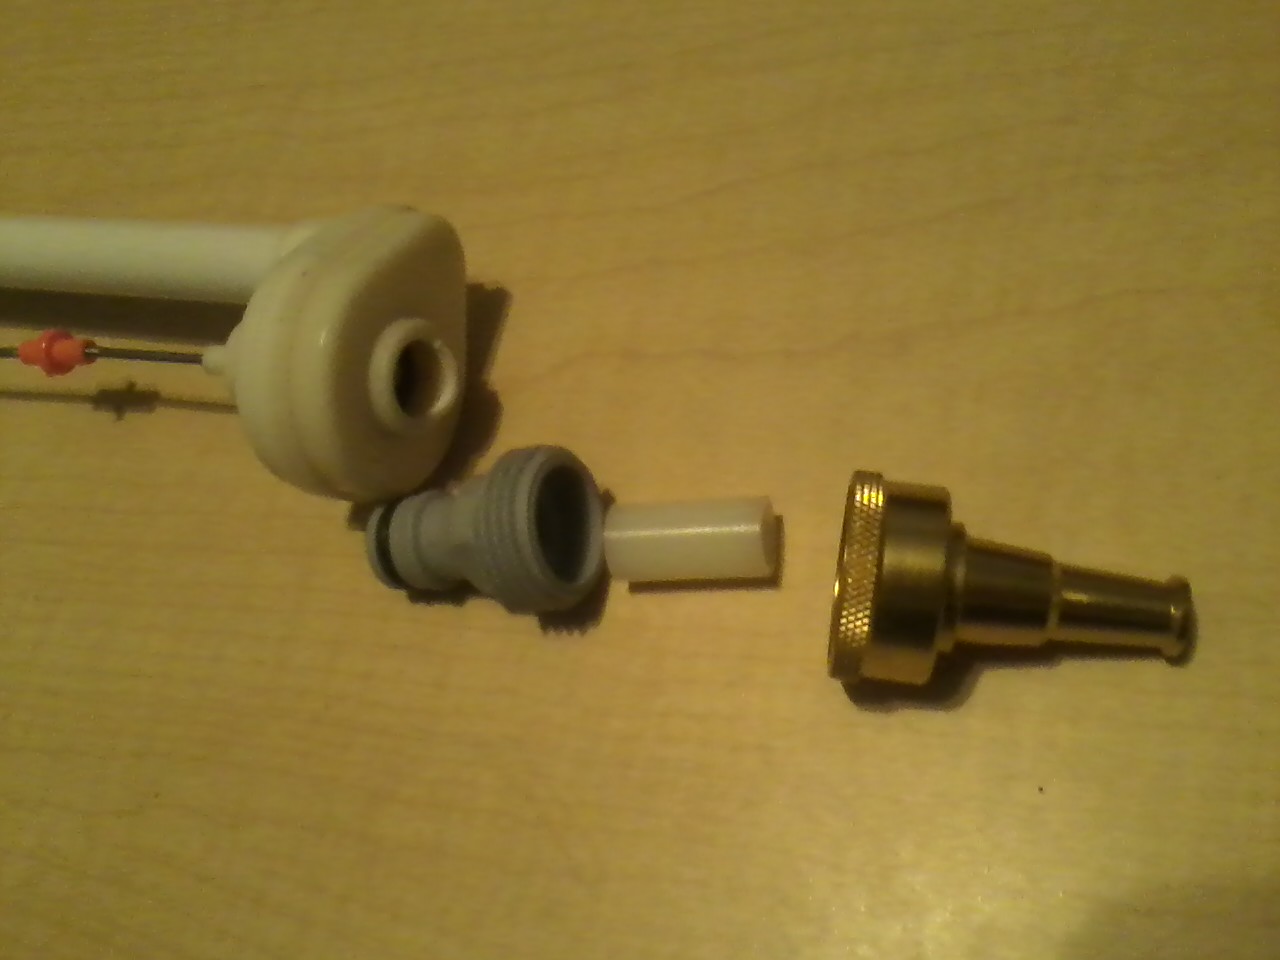
With that being said, I still think you're right, I need more than just a snug fit and some epoxy to keep the pipe attached without being launched off the end of the gun. This may be a little different from what you're talking about doing, but here's an idea I came up with.
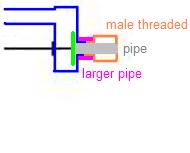
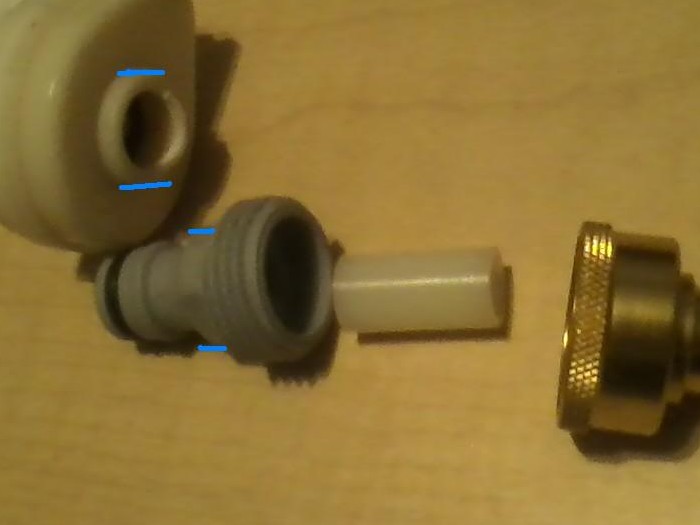
The grey pipe is the current pipe I already have that fits into the nozzle aperture. The orange male threaded piece is going to be the male threaded adapter which I have shown in the first pic. I need to cut off the quick adapt piece (with the o ring) where the red line is.
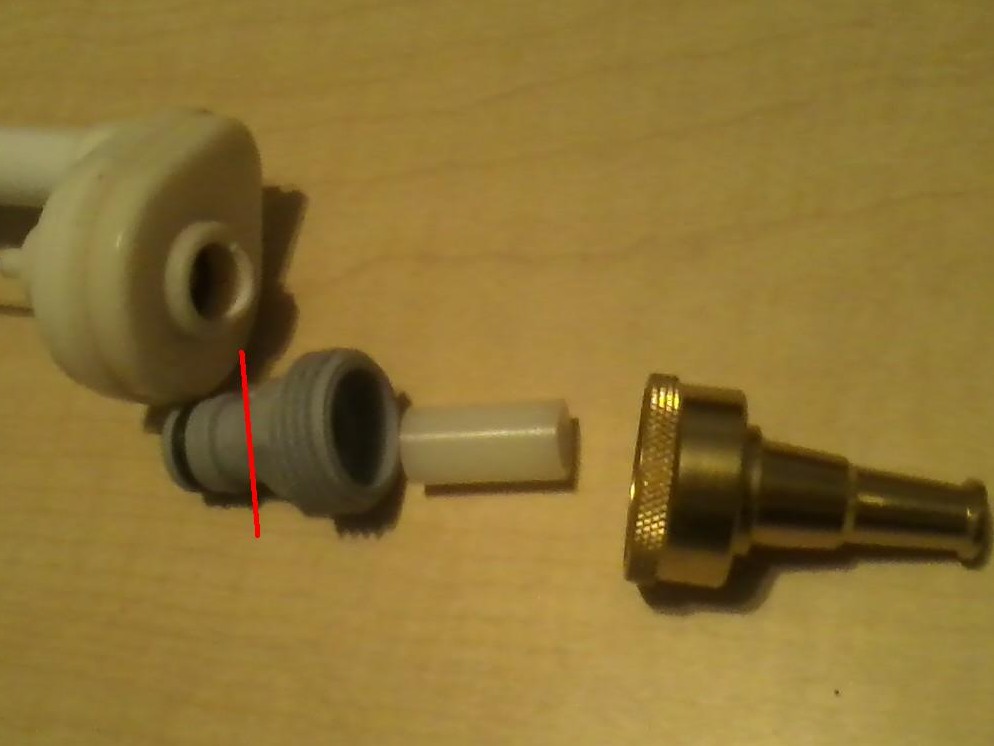
Then, the areas highlighted in blue will be touching and I want to find a pipe that has an internal diameter the same size as the outer diameter of the section highlighted with blue. I will smooth the hexagonal edges on that part of the male adapter, add some epoxy to the male adapter and the lip of the nozzle aperture and fit the larger pipe over both pieces to hold them together, as indicated by the magenta "larger pipe" in my paint diagram.
Do you think this will hold?
Re: Modding My XP Pool Pumper Blaster!
Posted: Thu Jun 20, 2013 7:01 am
by Drenchenator
Ok, that looks like a good idea then. I thought there was a very tiny lip sticking out of the valve, but those pictures reveal that there's plenty of surface area available. All that I could recommend is to clean up the surfaces and rough them up a little before applying any epoxy, so that the bond is stronger.
Re: Modding My XP Pool Pumper Blaster!
Posted: Thu Jun 20, 2013 1:13 pm
by TheSoaker
When I put a conical nozzle without a laminator I noticed some turbulence in the stream. So I recommend installing a laminator behind the nozzle.
Re: Modding My XP Pool Pumper Blaster!
Posted: Thu Jun 20, 2013 6:20 pm
by marauder
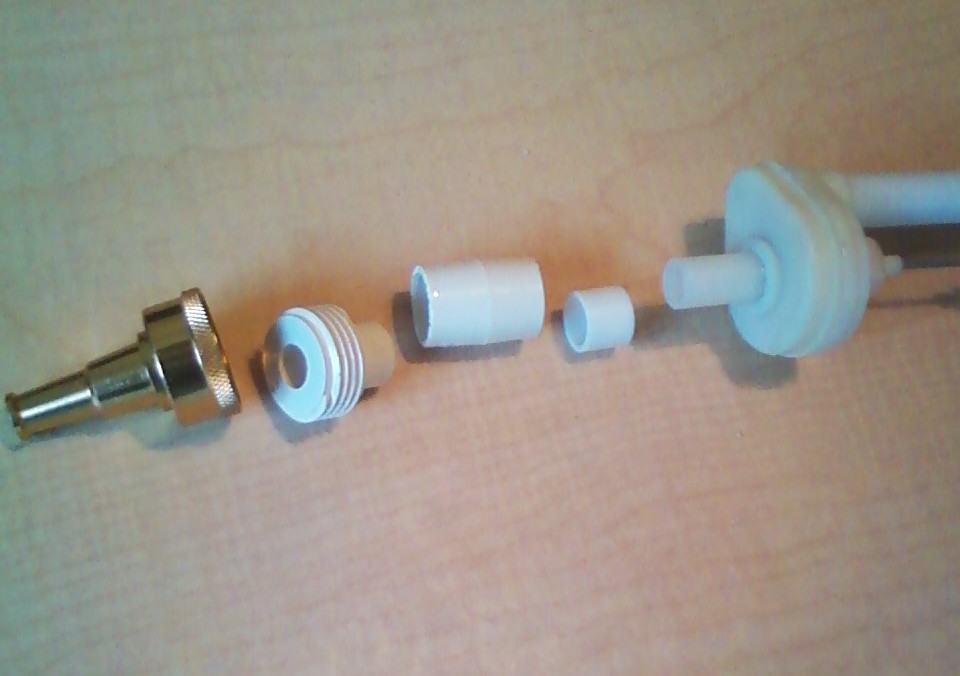
I got some good parts today. Man, I love these nylon spacers. I also love that male threaded end that has a reduced size pipe on the back in. Basically the parts go together in the order they are presented in the picture above. The pipe sticking out of the nozzle needs to be cut in half in order for this to all fit together. I probably won't have it ready to fire until tomorrow night, and then after that there's some more mods I want to do, but they are more durability mods. I'm going to be doing this without a laminator simply because I don't want to take the risk of making this mod even more complex than it already is.
Re: Modding My XP Pool Pumper Blaster!
Posted: Thu Jun 20, 2013 9:44 pm
by TheSoaker
Re: Modding My XP Pool Pumper Blaster!
Posted: Thu Jun 20, 2013 9:52 pm
by soakinader
Cool. Where did you buy these parts? What else are the nylon spacers good for?
Re: Modding My XP Pool Pumper Blaster!
Posted: Fri Jun 21, 2013 5:56 pm
by marauder
When I was cutting the nylon spacer in the nozzle in half it started coming out of the nozzle. I ended up just taking it out completely. Apparently the inside of the nozzle isn't completely flat, it's more like a small lip that drops down to a slightly larger lip before opening up to the main inside part of the firing valve.
OK, I found a CPVC piece that would replace the current nylon spacer sticking out of the nozzle, and the larger nylon spacer going over it. If you look up at that last pic I'm talking about the 2 on the far right, including the one sticking out of the nozzle. By using CPVC I would have only CPVC parts, aside from the actual gun and nozzle. I like that better because I trust PVC glue. Epoxy seems to be hit or miss. The only problem is will PVC glue work with the current gun? As in, with the stock parts? I may have to conduct an experiment to find out. If so that would be awesome. The only other problem is that the CPVC place I'm replacing the 2 nylon spacers with is slightly larger than the current nozzle aperture - but it is about the same size as the nozzle aperture once the lip drops off. So, in theory I could widen the current nozzle aperture very slightly, and then plug it up with the new CPVC part.
Any thoughts before I proceed? I'm going to be waiting til next paycheck to get some PVC cement anyway. I hope this works.
Re: Modding My XP Pool Pumper Blaster!
Posted: Fri Jun 21, 2013 6:19 pm
by DX
If you're using CPVC, it needs CPVC or all-purpose cement. PVC cement may or may not bond with CPVC, I've read mixed opinions.
Re: Modding My XP Pool Pumper Blaster!
Posted: Fri Jun 21, 2013 6:32 pm
by marauder
Oh. What's the difference between CPVC and PVC? I hope that CPVC cement and CPVC bond together like PVC Cement and PVC because that is a really strong bond. Of course, I plan on using water weld around the outside of this to give it more surface area contact with the gun itself. I'm going to taper the water weld from the back of the male end back to the outside of the valve. Water weld doesn't really seem to bond, but kind of makes a clinging ceramic type material that is really strong.
Re: Modding My XP Pool Pumper Blaster!
Posted: Sat Jun 22, 2013 10:09 pm
by SSCBen
With regard to a using a conical nozzle, research indicates that the gradual contraction is not necessarily important. In fact, I've read a paper that showed that a reverse conical nozzle (i.e., the outlet side is conical while the inlet is just a straight contraction) had a much longer break-up length than a more normal conical nozzle. I'm not recommending that (yet, at least), but I just want to point out that a flat nozzle is probably not too different from a conical one.
Nozzle design is a very complicated field, and there has not been very much scientific research into the effect of the nozzle on the stream. Most research into stream breakup completely ignored the effects of the nozzle, and the results were really inconsistent because of that. At this point, my suggestion is to try different things and see what works. Conical nozzles could work well, as could reverse conical nozzles. I've read that there are some advantages to rectangular nozzle holes. Sharp edge outlets (i.e., no "barrel") seem to help. Reducing the turbulence intensity via straws can help, though not always. Making sure all of your surfaces are smooth probably always helps.
I suggest using epoxy putty alone instead of your current plan (Water Weld is a type of epoxy putty that I don't think is designed for strength). You can put the stuff over a large surface area, which'll help with strength. You can attach it to PVC. If done correctly (clean, well sanded surface, etc.) it'll be about as strong as the plastic is already.
PVC cement probably works on most plastics too, but it is not a glue, and I don't think it works well to join dissimilar plastics. So I don't think it's a good choice for this repair. Also, nylon generally does not work well with epoxies from what I have read. Epoxy putty works on most plastics, depending on the formulation. The package should tell you if it will work on a particular surface.
Re: Modding My XP Pool Pumper Blaster!
Posted: Sat Jun 22, 2013 10:34 pm
by the oncoming storm
Ben needs to make an article about achieving high lamination, He is the best qualified person I can think of to do so.
Re: Modding My XP Pool Pumper Blaster!
Posted: Sun Jun 23, 2013 8:41 am
by SSCBen
I'm very interested in summarizing what I've learned about nozzle design, but unfortunately I will not have the time to do so until later this year at the earliest.
Here's a recent review paper which mentions most of the effects I have read about, but is more technical than I would be. I'd also want to write about the hypothesized relationship between stream break-up length and range, i.e., does increasing the break-up length necessarily improve range? We and other researchers basically just assume that it does, and I've never seen anyone test this assumption.
Also,
as I've said before, "lamination" is a vague (how do we know a stream has good "lamination"?) and non-scientific term (it does not appear in the scientific literature). It'd be better to say "low turbulence" and mean low
turbulence intensity, which is a well-defined quantity.
Re: Modding My XP Pool Pumper Blaster!
Posted: Sun Jun 23, 2013 6:15 pm
by marauder
That's very interesting. I still think that, based off experience with waterguns, conical nozzles seem to be best, or at least perform on par with standard nozzles. I'm considering adding a laminator after all.
Right now though, I'm working on making a quick connect backpack, and reinforcing the "firing pin." The firing pin is that metal pin that comes out the back of the firing valve. On the PPB it connects to an orange plastic piece which connects it with another, longer, metal pin which extends pretty far back. When you pull the trigger it pulls that which in turn opens up the firing valve allowing the gun to shoot. I don't like that the firing pin is 2 separate pieces of metal joined by a little orange plastic piece. I could move the connector and 2nd metal piece around way too much for my liking, so I'm making a longer plastic connector to keep the firing pin(s) rigid. I hope that this will give me a quicker trigger pull as well, since there will be less play.
My quick connect backpack hose system works pretty well right now. This is critical to have on a gun. I originally had a backpack on my PPB but you couldn't take it off, which was very annoying. The male end of the quick connect piece may also serve as a QFD port. I'm really excited to test that out, unfortunately my only QFD is back in North Carolina. The backpack that I have is 4L. It took me a longgg time to find a 4L backpack. I ended up getting it (months ago) from a manufacturer in Israel. I feel like 4L will be the perfect combination of field life and mobility for me. That's about 128 oz, with a ~50 oz PC capacity. Pretty close to a 2700's capacity with 20 oz more pc capacity.
I would post pictures but my card port isn't working right now.
Re: Modding My XP Pool Pumper Blaster!
Posted: Mon Jun 24, 2013 6:28 pm
by marauder
Ok, so I put it all together and tried to test it out today. I pumped it with a little air, pulled the trigger, it worked. Then I pumped it up with water all the way. It wouldn't fire. It just stayed pressurized. This is about the 5th time I've had this problem. Duke also said that when he had a PPB sometimes it wouldn't fire when fully pressurized. I thought perhaps was the problem was the top spring in this picture:
I thought perhaps the spring was just too old and weak to pull back the firing pin and open the firing valve. Maybe it was just compressing when I pulled the trigger and couldn't open the firing valve. I replaced it with a really thick, strong, heavy duty spring and put it back together. Same problem, it wouldn't fire. This time, when I opened the gun the firing pin was still pulled all the way back, like the valve should be open, but it was not. CA99 suggested that I push the firing pin forward and then try to pull it back again just to see if it would open the valve (and let some of the water still in the PCs leak out the nozzle). This did not work - but it did tell me what was wrong with the gun.
This orange piece. I suspected that it was weak in my previous post and sought to reinforce it. My reinforcement mod was 2 sections of wooden dowel drilled hollow and glued around it with a plastic hose pulled snugly over top of it with some glue. Well, it didn't work. The orange piece was pulled completely off of the first section (right most) of the firing pin. It came completely off and took the second half of the firing pin (the part that the trigger pulls) with it. I would take pictures but again, my computer is having difficulties reading the card. The only solution I see is to take it to a machine shop and have them make a new metal joint and weld the 2 firing pins back together with that joint, replacing the orange plastic piece. I won't be able to do this for a while unfortunately.
Now we know why PPBs often have difficulty firing when full. When you pull the trigger sometimes you pull the 2nd half of the rod and the orange joint with it part way off the original firing pin. This explains why the orange joint was so loosely connected to the first half of the firing pin (connected to the firing valve) to begin with.
