Pumps Guide - SuperPiston MK I and MK II
Posted: Mon Apr 15, 2013 5:05 pm
UPDATE: Obsolete information redacted/struck out. Outdated images have a red subtitle. Added a tips and flaws section to the bottom.
Homemade pumps. Two words that can make anyone cringe with horror stories of pump designs failing; pumps that leak/squirt or simply don't seal and cause massive problems.
After I've gone through homemades pump hell myself, I have come across the right way to build them. The key is all in the O-ring socket, which must be perfectly straight, and must be sturdy, or it will not work. Expanding wooden dowels don't do the trick, tape doesn't do the trick, and epoxy alone doesn't either. In addition, my design doesn't require any special precision tools to file/grind out any grooves, as we all know that doing so by hand doesn't work half the time. (It's also annoying and tedious to do.) You need every part of the pump seal to be made with precision, not cut by hand. Sure, those nice skirt seals used in stock blasters would be ideal, but until we can find a viable supplier in the U.S. for them, they're not a real option. (Short of buying cheap piston pumper knockoff blasters everytime you need a new pump, but you end up with a LOT of scrap parts, assuming the blasters' pump seals are even the right size.) So with that said, I present a full guide on pumps, all from scratch. The SuperPiston is very customizable and uses durable parts, although there's a few weak points in the design that I'm working to resolve but have not found any truly alluring solutions to yet.
This guide does not cover the rest of the homemade blaster, only the pump. This design in particular is for 1/2" sch 40 pipe; if you want a larger pump, you will have to figure something out, adapt this design with different components, and/or wait for me to come up with a solution for 3/4". This guide is for the MK II, but the MK I will be explained in the end.
Tools Required or Recommended:
- Hacksaw
- Drill
- Epoxy (The kind that works with stainless steel and aluminum; I use Devcon's Plastic Welder.)
- Epoxy Putty (It seems that any putty will do, but obviously steel ones are the best)
- Duct Tape (Optional; May actually be a bad idea; see rest of guide)
- Silicone Grease
Keep in mind that the pump consists of the following components: Seal assembly, Seal, Rod, Stopper, Cap, and Handle.
Parts:
- 1/2" Hollow Aluminum Rod (I can find these at Lowe's. You may be able to substitute this component with something from McMaster, but be absolutely sure that the OD does NOT go past 1/2"!)
- 3/8" ID 5/8" OD O-ring (I got mine at McMaster Carr, but they should be available at any hardware store. Your Sch. 40 pipe's ID will vary, so check. Ideally you'll want looser pipe ID.)
- 1/2" Sch. 40 PVC (This is the pump shaft. As mentioned, check the ID of the pipe for something looser. Looser pipes may need 2 O-rings, tighter pipes should have only 1. You can substitute this component with Sch. 40 1/2" clear PVC [can be found at McMaster], if you want some class.)
- 3/8" Socket Head Screw, Stainless (This component is key to the whole pump design. Length does not precisely matter as long as there's enough to go into the dowel for the epoxy to hold it in place, but make note of the differences in where the threads end near the head of the screw. Must be stainless steel for obvious reasons, although if you find one that's some type of plastic, it should work too.)
- Nylon Spacer; I used .375" ID, .562" OD, 1/2" Length. The spacer should be long enough to be stable on the socket head screw, but should still be short as possible. The ID must fit well on the socket screw (keep in mind that the threads complicate things and you won't really need an exact ID value, although a snug fit is best) and the OD must be enough so that it can hold the O-ring on while still fitting into the PVC pipe pump shaft. Do not use this component as it will result in leaking. Instead, make sure your aluminum rod is cut well, with a square end. I kept this for reference purposes, so just ignore it.
- Spacer/Stopper: You do not want to use the seal itself as the stopper, or disaster may happen. Make an additional one yourself along the rod. I used duct tape rolled up, but this seems to be making the water all nasty-colored. Epoxy putty would work well, but bear in mind that it will have to be grinded (with a Dremel or with sandpaper) if you carelessly make the spacer too large so that it doesn't fit in the pipe.
- 1/2" Endcap: The classic homemade pump cap. Alternatively, you can attempt a 1/2" male adapter and 1/2" threaded endcap, but I haven't tried this and can't vouch for it. Never, ever solvent weld any pump caps/adapters to the end of the pipe or you'll very likely regret it later. (And will likely need a hacksaw to fix problems.) This endcap requires a 1/2" hole drilled in the center and goes on the rod between the handle and seal.
- Handle. Do whatever you want here as long as the handle can stop the pump from going in too far. (You will need to measure things out and make sure of that.) One of my pumps simply uses duct tape wrappings, but if you want something more elegant, you can use PVC pipe, nuts and bolts, and drilled holes. See pictures, be creative too!
Assembly:
- Place O-ring(s) on the socket head screw; move it to the end until its flush with the screw head.
- Cut aluminum dowel to length as needed for your pump.
- Go to the end of the dowel that's cut straight. Unless you're able to cut it perfectly straight, used the end that was cut before it made it to the store shelves. (You may want to buy shorter lengths if possible for this.)
- Put epoxy on the exposed end of the screw, as well as on the opening of the rod. Place the seal assembly in, rotating as you go to spread the epoxy.
- Make sure the seal assembly is as centered and straight as possible with the rod! If the end of the rod you're using is cut perfectly, you shouldn't have to worry about this much or at all. On the other hand, if the cut is rough, sandpaper (or grind with Dremel) until its straight as possible, and use care when epoxying to ensure the seal assembly stays straight with the rod.
- Wait for epoxy to cure. I'd give at least 24 hours to be safe no matter what epoxy it is.
- Build/assemble/place the stopper on the rod itself, near the seal.
- Drill the 1/2" endcap, place on the dowel.
- Assemble/build your handle.
- Make sure the open end of the pump shaft is easy to insert the new pump into. File/sand the inner edge of it to create a curve. Apply some silicone grease (not too much) to the O-ring before inserting. (That's what she said.)
Pictures!
Hardware store socket head screws (stainless steel):
Hardware store nylon spacers:
MK II seal assembly parts:
MK II seal assembly put together (no epoxy yet) Do not use the nylon spacer pictured, just use the O-ring and place the seal assembly all the way in. Adding the nylon spacer will result in a leaky pump.
MK I seal assembly parts (and shows why stainless steel is needed; don't use the crappy, rusting screw depicted) next to PVC and duct tape handles, and drilled endcap:
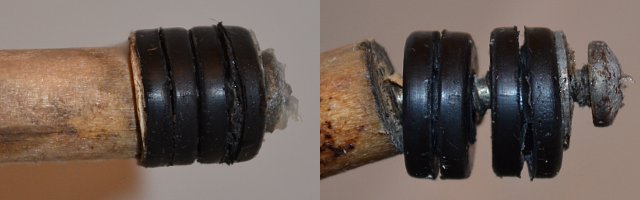
MK I seal fully assembled including epoxy (and this one uses the proper stainless steel screw) next to a failed epoxy putty O-ring holder experiment:
PVC handle (obviously needs shorter screws):
Unrelated, a disassembleable component on my homemade piston pumper that, when detached, makes a great war horn thanks to the check valve:
High resolution photos in a zip:
http://www.mediafire.com/?r5bljozhouceccl
Happy building. Also, any feedback on how to improve this guide and/or the pump design is welcome. I may try to push this off to HBWW's Workshop homemades section later if I have time.
Tips:
- Make your pump removable! Before the pump attaches to the rest of the homemade, add a threaded adapter and set up your homemade so that it can be detatched. I attached the other end of the pump shaft to a 1/2" male adapter that goes directly into a threaded tee.
- Use an internal pump rod stopper! I was able to find a screen that works very well as a stopper (which I placed between the pump shaft pipe and the 1/2" male adapter when solvent welding them) to ensure nothing gets stuck too far, should the seal assembly detach somehow.
- After epoxying the seal assembly to the pump rod, you can remove the seal assembly using an appropriately sized allen wrench (if using the socket head screw I suggested). Rotate counterclockwise to unthread it from the epoxy, but beware that this may weaken the epoxy itself. Never do this until the epoxy is fully cured. (Give it 24 hours in summer or 48 hours in winter to be safe.)
Flaws with this design:
- Having to use epoxy is not ideal. Your seal assembly won't be centered perfectly because of this which may cause problems. Be careful when epoxying the seal assembly to the pump rod.
- Plastic parts would cost less and be less prone to rust than stainless steel or even aluminum. I will investigate making a plastic version of this pump when time and money permit, but you will likely need to order parts from McMaster for that.
- Rubber grommets (same dimensions) may be a better choice of seal than O-rings. I need to test that.
- Schedule 40 PVC's ID varies wildly (they only care about making the OD fit into the fittings). Clear PVC may be made to tighter tolerances but I cannot verify this. However, it is a lot more stylish, albeit expensive and I'm not sure how well it solvent welds with regular PVC. (If not, you will need a clear PVC male adapter.)
You can experiment with 1/2" PVC pipe nipples instead, which seem to have better tolerances to ID. Beware that their ID's are different though, and you may need to cut the pipe nipple to length if it's too long. Once cut, the cut end behaves as a typical slip connection for PVC. Pipe nipples are usually in Schedule 80. Don't get metal ones unless you don't mind the extra cost and weight, or unless your entire homemade is metal.
Homemade pumps. Two words that can make anyone cringe with horror stories of pump designs failing; pumps that leak/squirt or simply don't seal and cause massive problems.
After I've gone through homemades pump hell myself, I have come across the right way to build them. The key is all in the O-ring socket, which must be perfectly straight, and must be sturdy, or it will not work. Expanding wooden dowels don't do the trick, tape doesn't do the trick, and epoxy alone doesn't either. In addition, my design doesn't require any special precision tools to file/grind out any grooves, as we all know that doing so by hand doesn't work half the time. (It's also annoying and tedious to do.) You need every part of the pump seal to be made with precision, not cut by hand. Sure, those nice skirt seals used in stock blasters would be ideal, but until we can find a viable supplier in the U.S. for them, they're not a real option. (Short of buying cheap piston pumper knockoff blasters everytime you need a new pump, but you end up with a LOT of scrap parts, assuming the blasters' pump seals are even the right size.) So with that said, I present a full guide on pumps, all from scratch. The SuperPiston is very customizable and uses durable parts, although there's a few weak points in the design that I'm working to resolve but have not found any truly alluring solutions to yet.
This guide does not cover the rest of the homemade blaster, only the pump. This design in particular is for 1/2" sch 40 pipe; if you want a larger pump, you will have to figure something out, adapt this design with different components, and/or wait for me to come up with a solution for 3/4". This guide is for the MK II, but the MK I will be explained in the end.
Tools Required or Recommended:
- Hacksaw
- Drill
- Epoxy (The kind that works with stainless steel and aluminum; I use Devcon's Plastic Welder.)
- Epoxy Putty (It seems that any putty will do, but obviously steel ones are the best)
- Duct Tape (Optional; May actually be a bad idea; see rest of guide)
- Silicone Grease
Keep in mind that the pump consists of the following components: Seal assembly, Seal, Rod, Stopper, Cap, and Handle.
Parts:
- 1/2" Hollow Aluminum Rod (I can find these at Lowe's. You may be able to substitute this component with something from McMaster, but be absolutely sure that the OD does NOT go past 1/2"!)
- 3/8" ID 5/8" OD O-ring (I got mine at McMaster Carr, but they should be available at any hardware store. Your Sch. 40 pipe's ID will vary, so check. Ideally you'll want looser pipe ID.)
- 1/2" Sch. 40 PVC (This is the pump shaft. As mentioned, check the ID of the pipe for something looser. Looser pipes may need 2 O-rings, tighter pipes should have only 1. You can substitute this component with Sch. 40 1/2" clear PVC [can be found at McMaster], if you want some class.)
- 3/8" Socket Head Screw, Stainless (This component is key to the whole pump design. Length does not precisely matter as long as there's enough to go into the dowel for the epoxy to hold it in place, but make note of the differences in where the threads end near the head of the screw. Must be stainless steel for obvious reasons, although if you find one that's some type of plastic, it should work too.)
- Nylon Spacer; I used .375" ID, .562" OD, 1/2" Length. The spacer should be long enough to be stable on the socket head screw, but should still be short as possible. The ID must fit well on the socket screw (keep in mind that the threads complicate things and you won't really need an exact ID value, although a snug fit is best) and the OD must be enough so that it can hold the O-ring on while still fitting into the PVC pipe pump shaft. Do not use this component as it will result in leaking. Instead, make sure your aluminum rod is cut well, with a square end. I kept this for reference purposes, so just ignore it.
- Spacer/Stopper: You do not want to use the seal itself as the stopper, or disaster may happen. Make an additional one yourself along the rod. I used duct tape rolled up, but this seems to be making the water all nasty-colored. Epoxy putty would work well, but bear in mind that it will have to be grinded (with a Dremel or with sandpaper) if you carelessly make the spacer too large so that it doesn't fit in the pipe.
- 1/2" Endcap: The classic homemade pump cap. Alternatively, you can attempt a 1/2" male adapter and 1/2" threaded endcap, but I haven't tried this and can't vouch for it. Never, ever solvent weld any pump caps/adapters to the end of the pipe or you'll very likely regret it later. (And will likely need a hacksaw to fix problems.) This endcap requires a 1/2" hole drilled in the center and goes on the rod between the handle and seal.
- Handle. Do whatever you want here as long as the handle can stop the pump from going in too far. (You will need to measure things out and make sure of that.) One of my pumps simply uses duct tape wrappings, but if you want something more elegant, you can use PVC pipe, nuts and bolts, and drilled holes. See pictures, be creative too!
Assembly:
- Place O-ring(s) on the socket head screw; move it to the end until its flush with the screw head.
- Cut aluminum dowel to length as needed for your pump.
- Go to the end of the dowel that's cut straight. Unless you're able to cut it perfectly straight, used the end that was cut before it made it to the store shelves. (You may want to buy shorter lengths if possible for this.)
- Put epoxy on the exposed end of the screw, as well as on the opening of the rod. Place the seal assembly in, rotating as you go to spread the epoxy.
- Make sure the seal assembly is as centered and straight as possible with the rod! If the end of the rod you're using is cut perfectly, you shouldn't have to worry about this much or at all. On the other hand, if the cut is rough, sandpaper (or grind with Dremel) until its straight as possible, and use care when epoxying to ensure the seal assembly stays straight with the rod.
- Wait for epoxy to cure. I'd give at least 24 hours to be safe no matter what epoxy it is.
- Build/assemble/place the stopper on the rod itself, near the seal.
- Drill the 1/2" endcap, place on the dowel.
- Assemble/build your handle.
- Make sure the open end of the pump shaft is easy to insert the new pump into. File/sand the inner edge of it to create a curve. Apply some silicone grease (not too much) to the O-ring before inserting. (That's what she said.)
Pictures!
Hardware store socket head screws (stainless steel):
- 1.jpg (109.48 KiB) Viewed 11187 times
- 2.jpg (88.33 KiB) Viewed 11187 times
- 3.jpg (65.68 KiB) Viewed 11187 times
- 4.jpg (60.01 KiB) Viewed 11187 times
- 5.jpg (59.08 KiB) Viewed 11187 times
- 6.jpg (43.78 KiB) Viewed 11187 times
- 7.jpg (60.78 KiB) Viewed 11187 times
- 8.jpg (32.33 KiB) Viewed 11187 times
http://www.mediafire.com/?r5bljozhouceccl
Happy building. Also, any feedback on how to improve this guide and/or the pump design is welcome. I may try to push this off to HBWW's Workshop homemades section later if I have time.
Tips:
- Make your pump removable! Before the pump attaches to the rest of the homemade, add a threaded adapter and set up your homemade so that it can be detatched. I attached the other end of the pump shaft to a 1/2" male adapter that goes directly into a threaded tee.
- Use an internal pump rod stopper! I was able to find a screen that works very well as a stopper (which I placed between the pump shaft pipe and the 1/2" male adapter when solvent welding them) to ensure nothing gets stuck too far, should the seal assembly detach somehow.
- After epoxying the seal assembly to the pump rod, you can remove the seal assembly using an appropriately sized allen wrench (if using the socket head screw I suggested). Rotate counterclockwise to unthread it from the epoxy, but beware that this may weaken the epoxy itself. Never do this until the epoxy is fully cured. (Give it 24 hours in summer or 48 hours in winter to be safe.)
Flaws with this design:
- Having to use epoxy is not ideal. Your seal assembly won't be centered perfectly because of this which may cause problems. Be careful when epoxying the seal assembly to the pump rod.
- Plastic parts would cost less and be less prone to rust than stainless steel or even aluminum. I will investigate making a plastic version of this pump when time and money permit, but you will likely need to order parts from McMaster for that.
- Rubber grommets (same dimensions) may be a better choice of seal than O-rings. I need to test that.
- Schedule 40 PVC's ID varies wildly (they only care about making the OD fit into the fittings). Clear PVC may be made to tighter tolerances but I cannot verify this. However, it is a lot more stylish, albeit expensive and I'm not sure how well it solvent welds with regular PVC. (If not, you will need a clear PVC male adapter.)
You can experiment with 1/2" PVC pipe nipples instead, which seem to have better tolerances to ID. Beware that their ID's are different though, and you may need to cut the pipe nipple to length if it's too long. Once cut, the cut end behaves as a typical slip connection for PVC. Pipe nipples are usually in Schedule 80. Don't get metal ones unless you don't mind the extra cost and weight, or unless your entire homemade is metal.